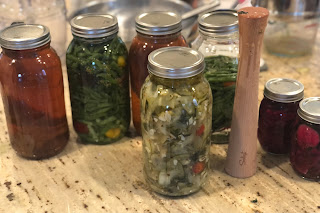
Sunday, August 29, 2021

Homemade Pasta Sauce!

 
Homemade Tomato Sauce!


It's late August, and the tomatoes taste AMAZING!!!!

Jar that goodness up!!!!


I mean seriously right now!!!   Pick from your garden or buy from your local farm and JAR it now!!!

Anyone with tomatoes, a jar and a pan can water-bath can.  

Disclaimer....  water bath canning needs acid and salt.  Don't mess with recipes unless you know your stuff.  Botulism is real.  

Here's my jars with 1/4 teaspoon of citric acid and a basil leaf per pint.


The tomatoes and spices cooking down.  


The beautiful tomatoes.


My amazing labor!!!


Recipe

I quadrupled it!

Makes about 5- 32 oz jars of sauce.  

10 pounds of fresh tomatoes
  1 cup good Extra Virgin Olive Oil 
  One yellow Onion
  One head of garlic
  1 bunch fresh basil
  1 bunch fresh Oregano
  1 sprig of fresh Rosemary
  Kosher salt
  Fresh ground pepper
  Pepper flakes (optional)

  1. Sanitize jars
  2. Sprinkle the garlic with olive oil, salt and pepper, then wrap in aluminum foil and roast the garlic in the oven at 375 for 30-45 minutes
  3. Boil a large pot of water and put tomatoes in in batches until the skins burst
  4.  Put the tomatoes in a bowl and let them cool
  5. Peel and clean the tomatoes- if you have a good food mill our a Vitamix, this peeling is optional
  6. If you have a food mill, break it out and put the tomatoes through it, if you don't have a food mill, squish the tomatoes with your hands.  This is fun and very stress reducing!!! 
  7. Dice the onion 
  8. Heat the oil in a large dutch oven or stock pot
  9. Cook the onion until soft but not quite browned
  10. Put the tomato "juice" into the pot with the onion and add the garlic
  11. Chop and add the herbs, reserving one basil leaf per jar
  12. Cook on low for 1-2 hours until your desired consistency is achieved
  13. Salt and pepper to taste.  Add pepper flakes if desired.
  14. Boil a large pot of water - creating a canning water bath
  15. Place either a tablespoon of lemon juice or 1/2 teaspoon of citric acid in each jar
  16. Place a basil leaf in each jar 
  17. Ladle into jars and place the lids on
  18. Boil the jars according to canning standards (Boil 32 oz jars for 45 minutes).  
  19. Remove the jars and make sure the caps have sealed by pressing them down and making sure they don't "click" 


Monday, August 23, 2021

September Zone 7 Planting Guide


Dare I say it...  It is almost time...  Fall Planting.  Our last hurrah before the end of this season.  I need your recommendations with this post... So many theories and so many ideas... add yours in the comments…  here are mine!  


Direct Sow:

  • Lettuce
  • Spinach
  • Kale
  • Kohlrabi
  • Swiss Chard
  • Chinese Cabbage
  • Peas
  • Turnips
  • Radishes
  • Beets
  • Carrots
  • Plant cover crops
  • Begin garlic planting
  • Begin onion planting
  • Begin shallot planting

Transplant:
  • Cabbages
  • Collards

I am still learning,  What have you planted or transplanted in September?  What's working, what isn't?  It's different for me each year.  Please share your experiences below in the comments!

Homemade Dehydrated Green Nutritional Powder

 Homemade Green Nutritional Powder


If you ever feel like you need a nutritional boost, but don't want to spend the high prices for green powder, make your own!

I LOVE THESE POWDERS!  I add them to protein shakes, sauces and baked goods.  I'll pour a little over my yogurt for a boost.  I'll even shake them with water in a mason far if I feel like I need some green goodness.  

You can use any green edible leaves, fruit, vegetables.  I like to use spinach, kale, lettuce, mulberry leaves, dandelion greens, squash leaves.

I often use any leftover greens growing in the garden that may have gotten bitter or that I have excess of.   During the dehydrating process, the bitterness seems to go away.  You can also use store bought greens when they are on sale or when you won't use your entire supply.  In this example, I am using organic store bought spinach.  


Required equipment:
- dehydrator or oven
- blender (I use my cheapy just fine)
- air tight jars for storage

First, place your washed, dried greens on the dehydrator trays.  I pack them in pretty good but not to dense.  They will shrink significantly as they dry.

If you are using the oven, place the greens on trays and set the oven to your lowest setting and keep a close eye on the greens.  They will be done much more quickly.  Some people like to just use the oven light to dehydrate and leave them for longer periods of time.


Next, set your dehydrator between 105 - 115 degrees for "raw" green powder.  Some folks recommend dehydrating at higher temperatures (over 145 degrees) to kill bacteria and for faster results.    Higher temperatures will dehydrate the greens faster, but will kill a lot of the healthy enzymes.  Make your choice based on your situation and goals.  

For 115 degrees, dehydrate for 8-10 hours
For 145 degrees, dehydrate for 4-6 hours


Make sure the leaves are super crunchy and not at all damp when they are done.


Place them all in the blender, and blend on high until they are a fine powder.  This may take a few minutes if you have a mere mortal blender like I do.  


Once you have a fine powder, spread the the powder out on a fruit leather tray or wax paper on put back in the dehydrator for another hour or two at 115 degrees.  This will remove any remaining moisture that might have been added during the blending process or were still in the leaves.


Next, place the powder into an air tight glass jar.  I use a piece of wax paper to transfer the powder onto then funnel it into the jar.  

The powder should last 6 months to a year in a dark cool location.


Italian Zukes in Olive Oil

It's that time of year!

Zucchini season!


Zucchini's are everywhere!!!  They are so yummy but you just can't eat them ALL NOW.  This will be a multipart series on preserving zucchinis.  Today we are making refrigerator preserved zucchini's in olive oil.  If the oil covers the vegetables, they will last up to six weeks refrigerated.  

This recipe is  AMAZING!!!  If you have extra zucchini's, you HAVE TO MAKE THESE!!!    Friends are unloading their zukes, and I will take them ALL!!!

Ingredients:

Toddler sized zucchini (really just 2 - 3 lbs), but adjust recipe based on your needs
8 cups water
4 cups white vinegar
3/4 cup sea salt or kosher salt

Hand full of Peppers (I like spicy, but use one red bell pepper or as many spicy peppers as you like) 
Either: 1 head of garlic, OR 1-2 tablespoons of pre-chopped, OR 1 teaspoon of dried garlic
Italian seasoning.  Fresh if you have it.  I used 10 sprigs basil, 3 sprigs oregano, 3 stems of rosemary.  You can also use 1 tablespoon of dried Italian seasoning
Red pepper flakes to taste
1 teaspoon of black pepper (preferably fresh ground)
Good olive oil (1-2 cups to cover)

1/2 gallon jar or multiple smaller jars

Here's whatcha do:

  1. Sanitize jars in dishwasher or by hand   
  2. Thinly slice the zucchini - use the food processor if you have one.  Use a mandolin if you have one.  A knife also works. 
  3. Bring water, white vinegar and salt to a boil.
  4. Add zucchini to the boiling water, in batches if needed.  Reduce to simmer.  Cook for 5 minutes.
  5. Remove zucchini with a slotted spoon into a strainer to strain extra liquid
  6. Rough chop peppers, garlic and herbs (if using fresh)
  7. Add peppers, garlic, herbs, black pepper to large bowl
  8. Add zucchini to the same large bowl and mix well
  9. Add mixture into prepared jar(s).  
  10. Use a chopstick to get out air bubbles by slowly poking and slowly stirring.
  11. Top with olive oil taking care that all the veggies are submerged.
  12. Refrigerate for at least one day but up to six weeks...  
  13. Enjoy on crusty bread, in pastas, as an amazing charcuterie with olives, bread and cheese! 


I would love to hear your zucchini recipes!  Leave them below in the comments! 


Sunday, August 15, 2021

Fermented Limes

 Fermented limes are divine! 


Fermented limes allow you to have that tangy sour wonderful taste WHENEVER you want it without having to run to the grocery store.  Plus as an added bonus, they taste BETTER!!!  And you get healthy gut probiotics!


Here is the best sales pitch I could find!

in 1869 a Boston physician wrote that pickled limes were among the “unnatural and abominable” substances consumed by children with nutritional deficiencies.”


Here's where I started.  I had a bag of limes and wanted to make sure I didn't waste any....


Then....  we chop the top/bottom nubs off, slice into fours, place in a mason jar and add non-iodized salt (I used Kosher today).  Be VERY liberal with the salt!!!

Traditionally you leave the lime connected at the bottom so the four slices are still connected like the picture below.  


Then pound them in.  The limes need to be covered with the acidic lime juice.  It will take some muscle power!  I recently invested in a fermenting pounder, but a spoon or anything that can crush them will work.  


Keep filling your jar alternating limes and salt!


Then keep pounding them down....  

Once you are done you need to weight down the limes so they are under the lime juice/salt mixture.

I use either fermentation weights or ziplocks filled with salt water.  Here is how I do the ziplock weights:


Fill a ziplock with a little bit of water and about a teaspoon of non-iodized salt.  Fill it to about the amount of head space you have in your jar... 


Then place the baggie into the top of the jar, making sure all the limes are submerged into the juice.  Air is not our friend!!!


I had to let some salt water out.  Here;s the ziplock keeping my limes safe!


And all set to sit out at room temperature for a week to a year and let the magic happen!!!!  The lime pith becomes less bitter.  The peels are the delicacy and the salty limey brine goodness makes amazing marinades!    If there is any non-white mold growing on the top, throw out the batch.  

Enjoy!!!!


Wednesday, August 4, 2021

Lavender Mulberry Jam


If you have a mulberry tree or access to one, you know!  They are plentiful, sweet, and amazing!!!  


This was my first year experiencing the wonderfulness of mulberries!!!  I have been reading about how they are a SUPERFOOD!!!  We moved into a two acre home with five beautiful mature mulberry trees.  Being an avid gardener and having gardener friends, we also grow/have access to a lot of lavender.  I am growing lemons, but being in Zone 7, and attempting indoor cultivation, we had to purchase lemons.  

But the Honey....  The honey is from our wonderful honeybees!  Honeybees are easier to keep than you would think.  They do require some maintenance to keep them healthy, but if you garden and are allowed, please consider keeping bees!  They are amazing and will reward you beyond what you would expect!  We have had up to six hives at a time...  at the moment my day job has been a tad more demanding than most, so I only have one hive.   

Harvesting mulberries takes a bit of skill...  more like tricks of the trade...  they grow like blackberries but up in a tall tree.  

I put down a frost row cover (could also be an old sheet or a tarp).


Then I use a bird feeder stand to shake the tree up high.  


And then we get the goodies!  These are purple and white mulberries!


You wash them/soak them in water prior to using them.  There are little stems, they are edible.  You can either strain them or grind them up.

Here's my recipe:

4 cups Mulberries washed (stemmed if you choose)
1 cup honey
4 lavender sprigs
Juice of one lemon

1.  (Optional) Put the mulberries, honey and lavender together in a pot at room temperature for several hours until the mulberries start to loose their juices.  Don't add the lemon yet.    
2.  Bring the mixture to a low boil for approximately 20 - 30 minutes.
3.  Add the lemon juice.  
4.  Use a hand blender or strain the mixture through a sieve.  This will either blend in the stems and some of the seeds or strain them out.
5.  Place the mixture into bottles.  If you will use within the next month or so, place in the fridge.  If you want to save it, can according to recommended canning practices.  


25 Pound Blue Hubbard Squash!!!

 So.... at the big box store this spring, I made an impulse purchase...  a small squash plant, promising large results.  It has been a fun and I will not go hungry in the near future!!!

Blue Hubbard Squash can get up to 40+ pounds.  This one is a mere 25.5 pounds.  I must say I am impressed!  

One detached from the vine early in the season and the flavor is nice and mellow.  Very much like a more mellow acorn squash.

Here are a few pictures of the monster!


I lacto-fermented a smaller Blue Hubbard squash, which has been delicious!  I did one plain to add to recipes and the other is fermented in Korean peppers. 


The ferments include 3 T kosher salt per quart of water plus the washed, chopped squash and 1 T of Korean pepper powder per quart for the spiced ones.  Make sure the vegetables are pushed below the water level and leave at room temperature for a week before tasting.  Once they get to your desired sourness, refrigerate.   If any mold forms or they smell bad, toss the batch.    

Sunday, August 1, 2021

August Zone 7 Planting List

August Planting List
Zone 7


We live in Zone 7 in Maryland in the DC suburbs.  The garden has been going strong for several months, but some of the crops have petered out leaving some blank spots.  The potatoes are all pulled, the early season crops are all either eaten fresh or turned into green powder (I'll post my process for green powder soon).  The first bush beans are starting to lose their oomph.  I used to think it was too late to still plant warm weather crops, but several people have had success with season warm crop plantings.  I'm trying it this year and will let you know!

Warm weather crops that can be planted in early August:   
  • Cucumbers
  • Zucchini
  • Basil
  • Bush beans
  • Small summer squash
  • Small winter squash
Cool weather crops that can be planted in August:
  • Parsley
  • Carrots
  • Radishes
  • Beets
  • Lettuce
  • Spinach 
  • Cabbage (start indoors if its really hot still)
  • Broccoli (start indoors if its really hot still)
  • Kale 
  • Kohlrobi 
  • Swiss Chard
Do you live in Zone 7?  What are you planting in August?  Leave your list in the comments.  Happy Gardening!!!

Mulberry Leaf Tea

 Mulberry leaf tea!


This is one of my beautiful old mulberry trees.  The berries are sweet and purple and wonderful in jams and sauces.  It provides delightful shade to our hammock.  

The mulberry tree (Moraceae Morus) is native to China but has been cultivated in many parts of the world.  There are many varieties such as the purple, red, and white.  We are lucky enough to have five mature trees, four purple and one white on our little homestead.


The mulberry leaves up close.  The lighter leaf is new growth and the darker have been around most of the season.

Fun fact:  The mulberry leaves are the sole food source for silk worms.

Mulberry Tea Health Benefits
(Sources listed below)
  • Most of Mulberry leaf tea's health benefits are due to a compound found in the leaves, 1-deoxynojirimycin or DNJ 
  • The leaves have a high antioxidant content which may lower cholesterol, triglycerides and inflammation 
  • Contains compounds which may combat diabetes by reducing blood sugar and insulin 
  • Contains minerals such as calcium, iron and zinc
  • Contains the antioxidants ascorbic acid and beta carotene   
  • It may promote liver health
  • Animal studies show that it may promote weight loss 


Mulberry Leaf Tea Risks
    • Some people report bloating, dizziness, constipation, diarrhea.
    • People on diabetes medication, pregnant women and children should consult a physician before consuming.  
    • Long term side effects are not known.

How to Make Mulberry Tea

This recipe can be used with both fresh or dried mulberry leaves.

    1. Boil two cups of water
    2. Use 4-5 leaves per 2 cup batch.  If using fresh leaves, chop them into strips
    3. Add the leaves to the water and boil for 5 minutes
    4. Strain and enjoy!


Sources:  
https://www.healthline.com/nutrition/mulberry-leaf#precautions
https://www.livestrong.com/article/265868-what-are-the-health-benefits-of-mulberry-leaf-tea/

Mulberry Recipe Collection

  Jams and Jellies Mulberry Lavender Jam Mulberry jam recipe – simple, quick & delicious recipe Mulberry Preserves Mulberry-Strawberry F...