Thursday, September 23, 2021

Canned Apple Pie Filling

  Apple Pie Filling


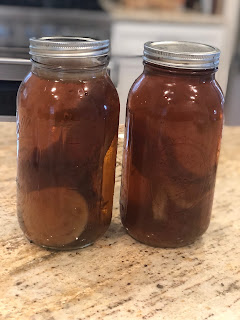
The picture above is 16 jars of pie filling and 6 jars of apple scrap vinegar with the leftover cores and scraps. 


Here's the ingredients... plus sugar...  minus the fat dog...


Chopping apples is so relaxing for me!  Especially because my family love the skin on!!!


The sugar, clear jel, cinnamon and nutmeg


Use the immersion blender or a traditional blender instead of mixing by hand, trust me!!!


All mixed up!


I tried to pour all the apples in at once...  better to put a few in at a time!  But it all worked out in the end!


Pouring into the jars...  the funnel makes this much easier!


Recipe

6 quarts apples (cored and sliced - approximately 30 medium sized apples) peel if you prefer
5 cups sugar
1 ½ cups Clear Jel
1 Tablespoon ground cinnamon
1 teaspoon ground nutmeg
7 ½ cups water
¾ cup lemon juice (must be bottled lemon juice)

Directions

  1. Sanitize 6-7 quart size jars
  2. Start your water bath canner
  3. Core and slice your apples (peel if preferred) into a large bowl (save the scraps for apple scrap vinegar)
  4. Place the sugar, Clear Jel, Cinnamon, Nutmeg, and water into a large pot - mix well (I find that I need an immersion blender or a blender for this step)
  5. Heat the pot stirring regularly until it turns into almost a pudding consistency
  6. Add the lemon juice and mix in thoroughly
  7. Add the apples, mix thoroughly and make sure apples are heated through ~ 5-10 minutes
  8. Using a canning funnel (or being very careful), fill the jars to within an inch of the top with the filling
  9. Using a chopstick or thin spatula, remove all the air bubbles from the jars, wipe the rims with a paper towel or clean dish cloth, and place a canning lid and ring on each jar, hand tightening
  10. Place in the boiling waterbath for 25 minutes (adjust for your altitude) 


Sunday, September 12, 2021

Apple Scrap Vinegar

 Apple Scrap Vinegar

Like Apple Cider Vinegar, only cheaper to make!


This is my first time making vinegar (on purpose).  I have blotched a wine recipe here and there and ended up with some really good vinegar.  This one will be purposeful :-).  

Basically, you make a sugar water then add your apple scraps and a little apple cider vinegar to jump start things, in and wait a few weeks until it turns into vinegar.  Sounds easy enough.  

First you need enough apple scraps to fill a small (or large) jar.  

Create enough sugar water to cover the apples.  Use a 1/2 cup of sugar (or honey) per quart of water. Add a little existing apple cider vinegar with the mother (optional - but speeds up the process), add a fermentation weight, cover either with a cloth or a mason jar lid that isn't tightened, and let it sit, stirring at least once a day.


Once the color of the base water starts to change (1-2 weeks), then strain out the apples and compost them, retaining the liquids.

Leave at room temperature for another 2 weeks to a month until the vinegar changes to a sour smell.  This will mean the alcohol has changed to vinegar.  

Ingredients:

Apple cores/peels/scraps to fill a quart jar
1/2 C. sugar or honey
1 T. Apple Cider Vinegar with the mother (optional)

Directions:

  1. Place your apple scraps into a glass or ceramic jar
  2. Mix your sugar or honey with water (non-chlorinated or filtered)
  3. Pour the water over the apple scraps so they are submerged.  
  4. Optional:  Add a little apple cider vinegar to jump start the fermentation.
  5. Use a fermentation weight if desired to keep the apples below the surface.  This will discourage mold.  Cover lightly with either a dishcloth or a jar lid that isn't on all the way.  You want to keep out the bugs, but let the mixture breath.
  6. Stir or shake daily (if you shake, make sure the lid is on tight for that, then loosen again).
  7. In about two weeks, the color of the liquid should start to yellow/brown.  This is time to remove the fruit.  Strain our the apple scraps and compost them.
  8. Leave at room temperature for another two weeks to a month, stirring daily until it smells and tastes sour like vinegar.  
  9. Move to your permanent storage bottle, cap and store out of direct light.  Use as you would apple cider vinegar for health purposes salad dressings, etc.  This also makes a wonderful base for herbal vinegar.  

Note:  Do not use this vinegar to home can unless you can test your acidity levels.  Acidity level testers can be found on amazon or from wine making suppliers.  Water bath canning requires vinegar of at least 5% acidity.   

Saturday, September 11, 2021

Jalapeño Hot Sauce

 Fermented Jalapeño Hot Sauce


I've been trying to eat more fermented foods to improve my health.  I also LOVE spicy hot sauce!  This sauce has quite a kick to it,  If you want to mellow it out, just replace the jalapeños with a less spicy pepper or add some bell peppers.

First, chop your peppers.  I recommend using gloves and/or a food processor for this.  You don't want to burn your eyes later... and believe me I have been curled up in the fetal position begging for milk to pour in my eyes while my teenagers are looking for their phones to video me.  It's not pretty and not fun.    

I chop the tops off and throw them in the food processor on slice so they make nice little rings.  Any rough chop will do....


Next I cold pack them into jars.  I like the 1/2 gallon or gallon jars because then everything is in one nice contained space, but any size/number of jars will do.  

The brine comes next.  This is a salt water combination which keeps the bad bacteria out and allows the good stuff to grow.  It is a combination of 1-3 tablespoons of non-iodized salt (I like to use kosher) for each quart of water.  I make a big batch and use it for all my ferments.  You won't need as much brine as your space because the veggies are packed in. 

Add the brine to the veggies and make sure they are submerged in the water either by using a fermentation weight or a ziplock filled with brine.

Here are two ferments going - this jalapeño hot sauce and a ginger carrot jalapeño sauce.  Mmmmm!!!!  I can't wait until they are ready!!!


Make sure you put a tray under your ferments.  These leaked all over the jars below....

Give them at least a week but up to a month depending on how sour you like your sauce.  I did two weeks for mine.

When you are ready, strain the brine out, reserving it.  Put all the peppers in the blending, then add equal parts reserved brine and apple cider vinegar.  Adjust quantities of brine and vinegar according to your taste and the consistency you want. The brine makes it more salty and the vinegar makes it more acidic.

Here they are all fermented up when I strained them - they loose a bit of their color and most of their crunchiness.  

Blend the mixture well and place in sterilized jars.  Store in the refrigerator for several months.


How easy was that???  


Ingredients:

4 pounds of fresh jalapeños
6 T. kosher or sea salt (non-iodized salt)
2 C. apple cider vinegar (preferably with the "mother")


Directions:

  1. Slice your jalapeños either by hand using gloves or in a food processor
  2. Pack the jalapeños into a large jar (1/2 gallon to gallon jars work well)
  3. Make your brine using 3 T. of salt per quart of water - dissolve the salt into the water to make a brine.
  4. Poor the brine over the jalapeños making sure they are submerged in liquid.  Place a fermentation weight, clean stone, or ziplock filled with brine over the jalapeños to make sure they stay submerged.
  5. Place a lid on the jar, but don't close it all the way.  You want the fermentation gasses to be able to escape and not explode your jar :-).  
  6. Place the jar(s) on a shelf at room temperature for 1-4 weeks depending on your desired sourness.  I fermented my jar for two weeks.  
  7. Drain the jalapeños, reserving the brine.  Place the peppers into the blender and add back 1-2 C. of brine and 1-2 C. of apple cider vinegar.  You will likely need to do this in batches depending on the size of your blender.  
  8. Place the sauce in sanitized jars and store in your refrigerator for several month.  
  9. I save the remaining brine to use as a marinade.  

Thursday, September 9, 2021

Enchilada Sauce (Waterbath Canned)

 Enchilada/Taco Sauce 

(Waterbath Canned)


This recipe is tomatoey, jalapenoey, but not too spicy.  Usually I overdo the spiciness, but this one is tame-ish.  Definitely not my family's enchilada sauce, because we light your tail on fire!  This is my kid sauce.  And by kid, I mean Makayla who actually likes her food to taste good and have flavor.  And a touch of spice.


Always follow safe canning methods.  Make sure you review and understand ".gov" and ".edu" sites for safe canning methods.  


I started with good grocery tomatoes.  By good, I mean the ripe of the vine stuff.  Not real fresh, but fresh enough.  I am cringing, and it's better than most people get from the store 11 months of the year. And it's mid-September, so they are 99 cents a pound.  And let's face it, they are pretty.  GIVE ME FARM FRESH ORGANIC OR BACKYARD ANY DAY!


After I peeled, I used the food processor to cut them down today.


Don't put them all in before checking capacity, oops!!!

Then cook them down, add your spices, and water bath can!


Recipe:

  • 8 quarts peeled chopped tomatoes (I pulverized in the food processor)
  • 3 cloves garlic, crushed
  • 5 cups chopped onions
  • 8 jalapeño peppers, seeded, chopped
  • 2½ cups store bough bottled lime juice (or bottled lemon juice, or 5% vinegar)
  • 2 tablespoons salt
  • Optional:  1 tablespoons black pepper
  • Optional:  1 tablespoon sugar
  • Optional:  2 tablespoons Mexican oregano leaves
  • Optional:  1 ½ teaspoon ground cumin 
  • Optional:  3 tablespoons fresh cilantro

Directions:

  1. Start to prepare your jars - I prefer the dishwasher method, but here are more:  https://nchfp.uga.edu/publications/nchfp/factsheets/sterilizing.html
  2. Start your water bath caner.  More info:  https://nchfp.uga.edu/publications/uga/using_bw_canners.html   basically a big stockpot with a metal veggie steamer or like thing on the bottom, filled with water that is kept to a desired temperature with the water at 1-2 inches above your canning jars without breaking them for the length of time required to make them safe :-).   
  3. Wash your tomatoes and give them a bath in boiling water for 30-90 seconds (some folks prefer to put an X in the bottom before boiling and an ice bath after, but I'm busy, and lazy, and my ice machine has never worked.  The tomatoes will crack and be ready to peel without all that, besides you will boil them down, so they will cook.  Pull them out of the boiling bath with kitchen prongs and stick them in a bowl once you see a nice crack/peel.  Or an ice bath if you are in a hurry to peel.  The peel them and SAVE the skins!!! (more later)
  4. Once your tomatoes are peeled, either dice them or pulverize them in a food processor or blender.  Then put them in a large dutch oven or stock pot on low.  You will need to stir both, but a dutch oven will transfer the heat a little better, so there is a little less chance of burning.  I do the tomatoes first because they need to cook down the most...  stir every minute or so making sure to ensure nothing is stuck on the bottom.
  5. Next take your onions and remove the paper skins/head/tail then chop into 4's.  Remove your garlic skins by crushing with a knife. Remove your pepper tops.  Either dice them all or put them through the food processor.   If you dice, please use food grade gloves or your eyes will be very unhappy with you later.  I wear contacts and have been not able to put them in for days.
  6. Add the onion, peppers, garlic to the pot (still on low) and stir every minute or so. 
  7. Add in the lime juice (lemon juice or 5% acidity vinegar can be substituted - VERY IMPORTANT THAT THE ACIDITY IS CORRECT to make sure you are safely canning.  Botulism is real!  And botulism doesn't like acidity (or oxygen - but that's lactofermentation)!
  8. Add the salt, pepper, oregano, cumin, and fresh cilantro if desired.
  9. Cook down to desired consistency.  At least 30 minutes, I prefer 90-120 minutes because my tomatoes haven't been paste tomatoes.
  10. Ladle hot sauce into 12  warm pint sized jars - wipe the rims and place the lids and rims on.
  11. Water bath them according to your elevation... mine is 15 minutes for pints at 0-1000 ft elevation.  
  12. Let them sit for 12-24 hours check for the seal by pushing on the lids and making sure they don't pop up.  Refrigerate any jars that didn't seal, label everything with the date and contents, and store canned jars for up to a year.


Original Recipe Source:  https://nchfp.uga.edu/how/can_salsa/tomato_taco_sauce.html

Tuesday, September 7, 2021

Ginger Carrot Hot Sauce

 Ginger Carrot Hot Sauce


Sweet, warm, spicy hot sauce!


Here's the unfermented peppers


And what it looks like after the ferment


Here's my little fermentation weight


And the goodness underneath!


Bottling it up!


And the yummy end result!

Ingredients:

2 lb jalapeno peppers (or other less spicy pepper based on your taste preference
2 inch of ginger
2 carrots
1 onion
5 cloves of garlic
6 T. kosher salt
1 C. apple cider vinegar

Directions:

  1. Chop all your veggies - rough chop is fine
  2. Make your brine (3 T. per quart of water)
  3. Pack your veggies in a fermentation vessel and cover with the brine - make sure the veggies are submerged.  Use a fermentation weight or a ziplock filled with brine to make sure the veggies are all covered.  Place a lid on loosely.
  4. Leave the vegetables at room temperature for at least a week, burping daily
  5. Strain the veggies and reserve the brine
  6. Place the veggies into the blender and add equal parts brine and apple cider vinegar and blend
  7. Funnel into jars and store in the refrigerator for several months.


Peach Pie Filling

 Peach Pie Filling 🍑 

There is nothing like a good tree ripened peach in early September!  To preserve that fresh sweet taste all year long for Thanksgiving and Christmas pies, we are going to make canned peach pie filling!


I only had seven peaches on hand, so this will be a small batch.  Feel free to double or triple the recipe.
I have read that the yellow peaches are well tested for canning and not to use the white flesh peaches.  Do your own research before using the white flesh ones.


These peaches smell sooooo good!!!

I am a big fan of leaving the skins on my peaches, but feel free to peel them.  The skins of many fruit and veggies have a lot of nutrients so I want to include them!


You will need a thickening agent.  I am using Clear Jel today.  You can also use corn starch, sure jell, or tapioca.


The sugar and clear jel were not really mixing in so well for me...  so I used the immersion blender!


It worked like a dream!


Then once it cooked for a bit...  it looked like this and it's time for the spices and lemon juice

Then you add the peaches back in

And as soon as it starts to simmer again, its ready to jar up!


Remove the bubbles add the lids, then water bath them!


Ingredients:

7 peaches (be sure to use yellow flesh peaches)
1 C. sugar
1/3 C. clear jel (cook type, not instant) You can also use 3 T. cornstarch
1 C. of reserved peach cooking liquid
large dash of cinnamon
small splash of almond extract
1/3 C. lemon juice

Directions:

  1. Prepare your water bath canner (if you don't have a water bath canner, place a steamer pan or metal pie pan in the bottom of a large stock pot and place enough water in to cover your jars by 2 inches)
  2. Sterilize your jars and lids
  3. Slice and pit your peaches.  I like to leave the skins on, but feel free to skin them if you choose. 
  4. In a separate sauce pan, add 2 cups of water and bring to a boil.  Add the peaches and let cook down for 2-3 minutes.  
  5. Strain the peaches and keep the liquid - set the peaches aside
  6. Measure 1 cup of the reserved cooking liquid to the pot along with sugar and clear jel or cornstarch.  Whisk until there are no clumps left.  I had a hard time getting rid of the clumps, so I used my immersion blender.  
  7. Bring to a boil and add the cinnamon, almond extract and lemon juice (lemon juice is required to bring the acidity to a safe level for canning)
  8. Add the peaches back into the pan and bring back to a simmer for one minute
  9. Ladle into prepared jars, removing all air bubbles and leaving 1 inch of head space.
  10. Process in the water bath canner for 30 minutes if at sea level (look up your elevation of adjusted times)
  11. Let cool for 24 hours and check seals.  Sealed jars will last a room temperature for one year and store unsealed jars in the refrigerator for a week.  


Sunday, September 5, 2021

Basic Kombucha

 Kombucha

1 gallon recipe 

Kombucha.  You either love it or hate it.  If you love it you know how expensive it is at the store!  Did you know how easy it is to make???  

Kombucha is just a ferment starter, black tea, sugar, water, and the extra flavorings.  Don't worry, the sugar gets mostly eaten by the scobi so it is a low sugar drink.

What's a SCOBI???  Its a probiotic healthy kombucha starter that looks like an alien.  It is a living organism.  Here is the absolute nicest, most g-rated scobi picture I can get...  believe me it goes down hill from there....  and they are still good and TOTALLY healthy!  


Here's a more typical scobi:

All that funk is the good stuff you want.  


Here's my starting point...  8 tea bags per gallon.  One cup of sugar, and one scobi and one cup of starter.  That't it!  So easy!  Then you need patience.  That's hard... and to decide on your flavors, the more patience, then to decide on your pretty jars.   That's hard too.  But making Kombucha is easy!

Here we go!

Local friends near Olney/Rockville MD, let me know if you need a scobi starter! Just comment below and I will get you one just as soon as I can!


Ingredients:

1 gallon jar 
(or smaller, but you need one scobi and one cup of starter per jar)
8 bags of black tea
1 C. sugar 
(white granulated works best - don't worry - the scobi eats it and leaves you probiotics and very little residual sugar)
1 scobi 
(can be purchased off Amazon or made this way with store bought komucha:    https://www.thekitchn.com/how-to-make-your-own-kombucha-scoby-cooking-lessons-from-the-kitchn-202596 - If you have a friend who makes Kombucha - they will want to help...  or local folks hit me up...  I often feed them to the chickens because I only need a small number.  

Clean breathable cloth and large rubber band 


Directions:

  1. Boil water and make a STRONG tea with the 8 tea bags.   I steeped them all in a quart jar, but you can steep right into your gallon vessel, filling about half way.
  2. Mix sugar with boiling water and dissolve in a separate container.
  3. Remove tea bags, then mix tea with sugar mixture into your vessel
  4. Fill with filtered water 1.5 cups shy of the gallon rim 
  5. Make sure the temperature is below body temperature by feeling the jar (should be between room temperature and body temp)
  6. Add your scobi and cup of kombucha
  7. Cover with a cloth and band and put somewhere between 65-85 degrees.  Taste after a week for desired acidity.  Leave for up to two weeks, three if its cooler in your house.
  8. Once you like the flavor, remove the scobi and scobi babies if any exist.  Place a cup of your kombucha with each scobi in a ziplock or into your next batch or to share with friends.
  9. Bottle your kombucha: funnel into prepared sterilized bottles (straining if desired).
  10. If additional flavor or carbonation is desired, add the flavorings to the bottles, then store at room temporary for up to three days.  Refrigerate until ready to drink. 


Friday, September 3, 2021

HOT Jalapeño Jelly

 HOT Jalapeño Jelly


Perfect on a cracker with cream cheese!  Spicy, sweet and tangy!


The food processor makes quick time of the chopping plus no hot hands to stick in your eyes!


The boiling part needs to active - no walking away from this one!  But it's quick.  I whipped this batch up on my 30 minute lunch break.


The end result.  I would use just green or just red peppers next time to make it prettier, but the taste will be the same!


Recipe:

4 C. Finely chopped Jalapeno peppers (freshly picked if available)
1 C. Apple Cider Vinegar
5 C. Sugar
1 pouch pectin (I used powder Sure Jell 1.75 oz)

Directions:

  1. Sterilize your jars and lids in boiling water or in the dishwasher
  2. Slice the peppers very small - use the food processor if you have one.
  3. Place peppers into a saucepan with the vinegar
  4. Measure the exact amount of sugar and SET ASIDE (will not set with incorrect sugar measurement)
  5. Bring the peppers and vinegar to a rolling heavy boil
  6. Add the sugar and pectin and return to a boil, stirring
  7. Once boiling again, cook for EXACTLY one minute at a rolling boil, stirring the entire time
  8. Remove from heat and skim any foam
  9. Ladle into prepared warm jars right away to within 1/4 inch of the top
  10. Wipe the rims to ensure clean so the lids can seal
  11. Place the flat and ring lids on the jar
  12. Place into boiling water bath for 10 minutes - elevated from the bottom of the pan and covered with 2 inches of water.
  13. Let sit out for 24 hours and ensure all the lids have sealed.  Listening to the "pings" of them sealing after you take them out is SO SATISFYING!!!  If any did not seal, place them in the fridge and use them within 3-4 weeks.  The sealed jars may be stored in a cool dark place for up to one year. It may take a few days for the jelly to set.

Wednesday, September 1, 2021

Cowgirl Candy

 OMG!!!  Yes, and more yes.  Spicy sweet amazingness!!!  

Candied peppers are da bomb if you like sweet and spicy!!


You need to start with good fresh peppers


And the best part is the remaining marinade!!!


I mean the stuff that makes the peppers sweet and so good too.

Save any remaining sauce to marinade your tofu or chicken or fish for the next week. 

Okay.  Its really good.  

Ingredients:

4 pounds fresh jalapenos run through the food processor slicer or chopped (with gloves)

2 cups apple cider vinegar

6 cups sugar (I know I hate it too)

2 tsp garlic powder or 2 T. fresh chopped garlic

1/2 - 1 T, turmeric

Optional:  1/2 t. celery seed, extra red peppers, Mexican oregano, curry, be creative, etc.


Recipe:

  1. Sterilize jars and lids.  I used 5 pints.
  2. Make sure all your ingredients are ready:  Chop peppers, discard stems, chose if you want seeds, and get everything out.  This is quick!
  3. Prep the sauce:  Boil vinegar, sugar, garlic turmeric, plus any extras you choose.   Set a timer and boil on medium heat for exactly 5 minutes.
  4. Turn the heat up and add the peppers.  Reduce heat to a simmer and cook for exactly 4 minutes.  
  5. Use a slotted spoon and a canning funnel (if available) to transfer the peppers to the jars.
  6. Use a ladle to fill the jars with syrup.
  7. Clean the rims with a clean towel (very important)
  8.  Refrigerate for 6+ weeks or can

Canning Instructions
  1. Follow USDA canning guidance!!!
  2. Water bath pickled vegetables for 10 minutes per pint and wait for the lid to "ping"

Mulberry Recipe Collection

  Jams and Jellies Mulberry Lavender Jam Mulberry jam recipe – simple, quick & delicious recipe Mulberry Preserves Mulberry-Strawberry F...